It can be a highly lucrative business to develop an eCommerce website online if you already have a retail store, or you want to start a new venture from the ground up.
An eCommerce website is the starting point of every successful eCommerce business. If you’ve never developed one before, it can come across as a difficult task.
However, it is not as complicated as you might think. I’ll show you how to get your eCommerce website operational quickly.
Website Builder With Ecommerce Features
Before you start building your eCommerce site, you must first decide on a platform to use.
There are numerous options available, but one that stands out is eCommerce with Wix.
It’s a highly sought-after website builder with eCommerce features, mainly due to its ease of use.
You don’t need to have any technical knowledge or know-how to code to get started. The platform allows everyone to quickly and easily build an attractive and usable eCommerce website from the ground up.
As a result, it’s ideal for beginners. It’s a highly customizable eCommerce website builder that is SEO-friendly with drag-and-drop functionalities.
What exactly is drag-and-drop? It’s a form of a website builder with eCommerce functionalities that lets you drag and drop different website components to customize them to your requirements.
Everything you’ll need to get started selling online is included in the platform. You’ll be able to collect payments without any commissions, handle the complete fulfillment process, and set customized shipping rules globally in addition to the eCommerce website builder features.
Ecommerce With Wix
Choose eCommerce with Wix if you would like to have complete control over your storefront, product galleries, shopping cart, and more without having to write any code. You’ll also have the ability to add features such as a wish list for customers, relevant product galleries, add-to-shopping cart buttons, and mini-cart, among other things.
You are able to add discount codes, coupons, or even allow customers to sign up and create accounts to improve customer retention and fasten the checkout process by saving shipping and billing information.
Multichannel selling and dropshipping are also supported by Wix. It enables you to promote on other social media sites such as Instagram and Facebook.
The cost of eCommerce features begins at $23/month. It includes extras such as $300 in advertisement promos and a 1-year free domain.
You can upgrade your plan easily with the growth of your website.
How To Create A Website With Ecommerce Features
Here are the 5 steps to develop an eCommerce website.
- Create account with an eCommerce website builder
- Choose how to create a website with eCommerce features
- Connect the domain
- Develop an eCommerce website
- Make your eCommerce website public
Use any website builder with eCommerce features to complete these steps. However, for the purposes of this article, we’ll use eCommerce with Wix as a case study.
Step 1: Create Account With An Ecommerce Website Builder
To begin, sign up for a Wix account. The registration process is quite straightforward when compared to other platforms—it takes no more than 10 seconds. To proceed, you only require an email and a password.
You are able to get started with Wix right away. However, the free tier does not have any eCommerce features. It’s essentially a free trial to experiment with the eCommerce website builder, which is great, but you want to start selling and making money.
Pick “Business & Ecommerce” from the premium subscriptions menu.
The “Website” packages don’t always have online sales features, which you’ll require for your eCommerce website.
All the eCommerce packages include the option to perform online payments, as well as an SSL certificate, unlimited bandwidth, more storage, and a 1-year free domain.
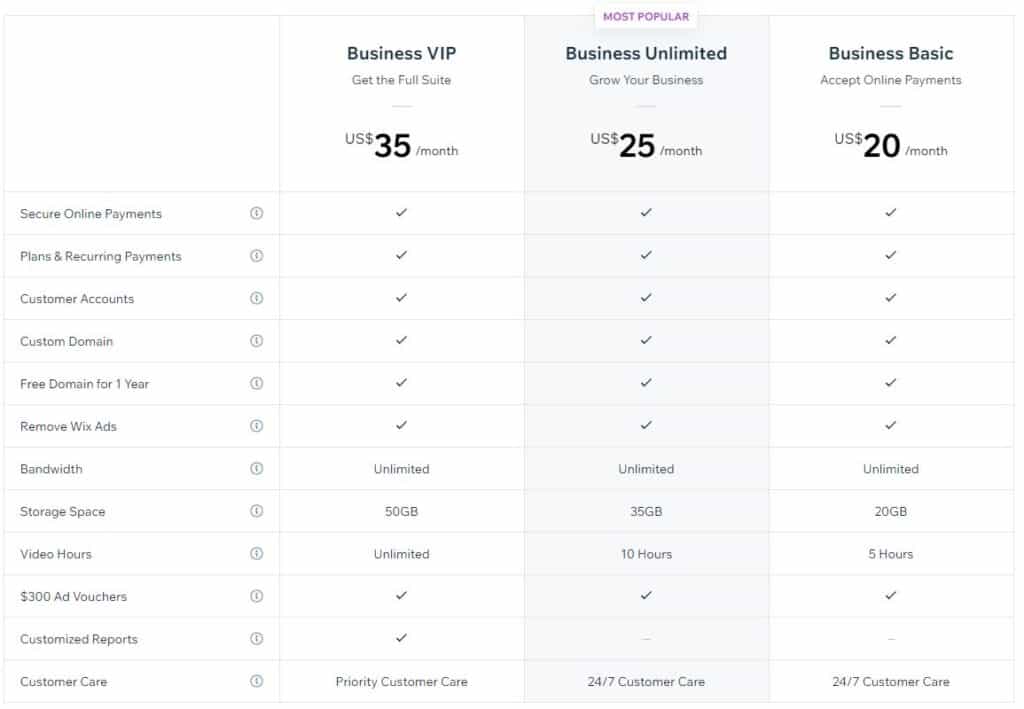
Select a package that is appropriate for the scale of your business and website. If you’re a small business selling a few items, the Basic Business plan or the Business Unlimited will suffice. Larger websites with more complex requirements should choose the Business VIP package or, go for the Enterprise solution.
A 14-day refund policy is offered by Wix. If you’re not happy with your decision, you can always cancel or switch plans within that time frame.
Step 2: Choose How To Create A Website With Ecommerce Features
There are 2 approaches to getting started once you’ve signed up. To continue, you can either use the Wix Editor or the Wix ADI to develop an eCommerce website.

Their artificial intelligence website builder with eCommerce features is Wix ADI. You’ll answer a set of questions regarding the eCommerce website, and the platform will use artificial intelligence to build it for you in minutes. As for the Wix Editor, you’ll begin with a basic template and customize it to your liking.
There is no one way of doing things here. It is entirely up to your own preference. And if you get started with the ADI, you’ll still have the ability to change things later in the editor.
For beginners, relying on artificial intelligence for eCommerce website development based on the responses you provide is possibly the best choice. It’ll be quicker, and instead of starting from the ground up with a basic template, you’ll have a working site to edit.
However, the Wix Editor is also simple and straightforward. It might take a little longer.
If you work with Wix ADI, you’ll be requested to select the kind of eCommerce website (for example, a retail clothing store, sports equipment, etc. ), as well as the features you want (such as live chat, Instagram feed, subscribe form, etc.).
The AI software will import material from your own site or Google Places for those of you who already have an online presence.
After that, you’ll be required to choose a template and a theme.

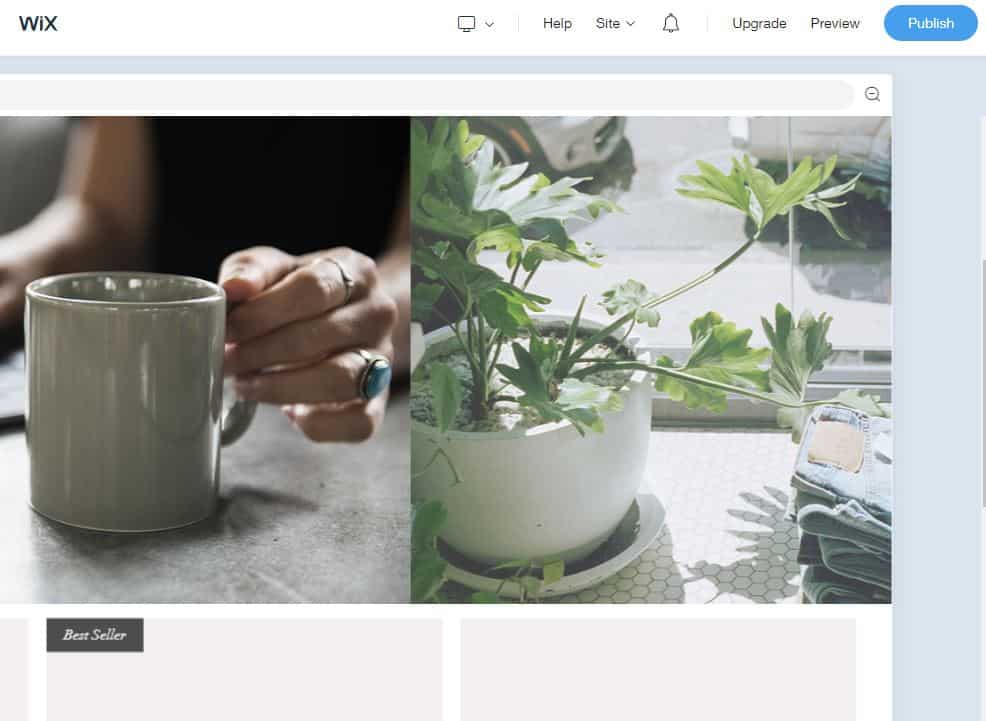
I was able to complete the entire procedure in a few minutes, and the platform built an eCommerce website for me automatically. Then it’s just a matter of filling in the template with text, photos, and whatever else that is needed.
Step 3: Connect The Domain
Before you get the eCommerce website published, you would need to connect the domain.
Select “Domains” from the “Settings” link on the dashboard.
You have two choices here: purchase a new domain name or add an existing one that you own.

Find a reputable domain registrar if you need a new one. Following the procedure to associate a domain that you own is simple once you’ve purchased it.
Usually, getting a domain name from a registrar is the best option. But if you prefer keeping it simple and going through the eCommerce platform, that works as well.
Step 4: Develop An Ecommerce Website
After you’ve connected your domain, you’ll need to configure your site’s eCommerce features. These are the elements that will facilitate the sale online.
- Add the items
- Configure shipping zones
- Decide on payment options
Below, I’ll provide you with a brief rundown of each of the eCommerce website components.
Items
Navigate to the “Store Products” menu of your dashboard to add a product. Then, press “+ New Product” to add the product.

From there, you can name the item, add it to a list, set the cost, and write a product description. You may also provide product photos and videos.
For doing eCommerce with Wix, it allows you to add an item ribbon (like “new arrival”), label it with “on sale,” add a section for the return policy or care instructions, and handle tax settings.
You’ll also have complete control over package size, color, and inventory tracking.
Shipping
The next step is to handle your shipping laws. Decide which regions you’ll be exporting to and how the prices will be measured.
For the tutorial’s example site, I set up free shipping in the United States and a flat rate for foreign orders.
Perhaps you just want to sell to people in the United States and Canada. Simply uncheck the international toggle box on the right side of the screen and select Canada as a new zone.
When it comes to shipping rates, you’ll have a variety of options. You may, for example, provide free shipping to customers who spend a certain amount per order.
It is possible to charge shipping by weight, order total, or USPS-determined rates in addition to a flat rate. You can also monitor handling rates and give customers the option of picking up orders in-store in some areas.
Payment Options
You must first configure your payment methods before you can be paid. With Wix’s payment processing system, this is a breeze.
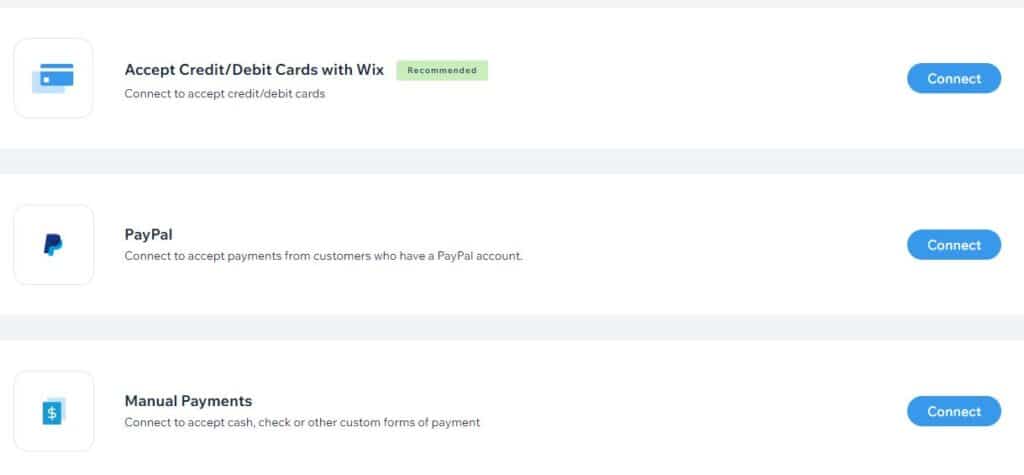
I usually choose the accepted credit/debit card option as well as PayPal.
This allows you to accept American Express, Visa, Mastercard, Discover, Maestro, JCB, and, UnionPay among other major credit cards.
The processing fee is 2.9% plus $0.30 for each transaction, which is fairly common in this industry. In addition to that, Wix does not charge any extra fees.
Step 5: Make Your Ecommerce Website Public
It’s finally time for the crucial step: the website’s launch.
You need to have a domain connection (as pointed out in step 3) to do this.
You also need to sign up for a paid plan. It is possible to technically publish your website on a free tier, but it won’t have a custom URL. Without a paid plan, you won’t be able to use any eCommerce features. Therefore, if you haven’t already done so, make sure to complete your subscription for the plan before continuing.
To publish your website online, click the publish button on the editor.
The site preview can be generated by using the AI eCommerce website builder I mentioned earlier, even without changing the interface, adding photos, or customizing anything.
It also shows how simple it can be to set up an eCommerce platform if you want to do so.
Best Practices To Develop An Ecommerce Website
Your eCommerce website will be operational soon if you follow the five steps outlined above. It’s easy to do eCommerce with Wix, and anybody could do it.
However, this will not be enough to make your website successful. Here are some best practices to follow when you create a website with eCommerce.
Use A Straightforward Approach For Ecommerce Website Development
Keep the theme simple, along with the homepage, product listings, and internal pages.
Don’t try to cram every product you’re selling onto your homepage. Only choose 4 to 5 of your best-selling products to highlight. You can also have a giant picture of your most popular product with a call to action above the fold.
Because of the simplistic layout, your site visitors will be introduced to your best-selling items right away, increasing the chances of making a purchase.
Contact Section
The contact page, like the other eCommerce pages, should be straightforward.
Your address, phone number, email, and contact form should all be included so that people can contact you. Make sure the contact form sends details to a regularly monitored email address. You’ll be able to reply to customer messages as quickly as possible this way.
About Page
The About page shouldn’t be a dry history of your company’s beginnings and what you’re selling.
This page is your opportunity to share a compelling story that motivates consumers to be part of your mission. Perhaps you can give away 10% of the profits to help save the environment. Perhaps you’re a Certified B Corporation that only buys inventory from environmentally friendly vendors.
The About page must be genuine and as simple as possible. It needs to appeal to your target audience and strike a chord with them.
Names Of Products
Rule of thumb: If you don’t have a lot of experience naming things, stick to simple names rather than trying to be too imaginative.
So many eCommerce websites make their product names too complex. Customers respond with confusion and eye rolls as a result of this.
For an amazing product, a plain and boring name would still result in a lot of sales. However, a bad name could be a deal-breaker.
Descriptions of Products
A specific product summary should be included with each item on the eCommerce website. This is basically a 1- or 2-paragraph product pitch.
The following is the standard format for product descriptions that I would recommend:
- 1 or 2 sentences describing the problem that the product is solving.
- 1 or 2 sentences describing what it will be like after the problem is solved.
- 2 or 3 sentences outlining how the product addresses the issues and the features that are supported.
Having said that, not all product listings solve a problem. Clothing and accessories are good examples. Customers purchase a fashionable t-shirt to boost their confidence, distinguish themselves, and improve their appearance. In this scenario, the description needs to focus on how the item makes the consumer feel rather than the product itself.
Product Images
It might sound corny, but a photo is really worth a thousand words. You can’t market the goods solely based on their descriptions.
To photograph your items, hire a skilled photographer. Take pictures of the items from all angles. Add product demos. If you’re selling pants, instead of just putting them flat on a table, take pictures of someone wearing it. Show someone walking with the hiking boots on a trail if you’re selling them. Take a picture of the bedsheets on a real bed if you’re selling bedsheets.
You can also add videos to the items, as I described briefly in the steps outlined earlier. This is ideal for items that require some form of a demo, which cannot be accomplished solely by photographs.
Final Thoughts On Ecommerce Website Development
It is not difficult to create a website with eCommerce features. With Wix, you can do it in a few minutes.
It’s a little more difficult to develop an eCommerce website that visitors would enjoy (and buy from). That necessitates a combination of good design, effective marketing strategies, and tenacity.
In just 5 easy steps, you can do eCommerce website development with the help of a website builder with eCommerce features.
Follow the guidelines mentioned in this article. To complete this process, you do not need to have any technical knowledge or coding skills.