
When you are working towards having your website rank up in the search engine, you can use as many SEO tricks as possible. Creating sitemaps is a technique that will undoubtedly be helpful in the improvement of your SEO strategy. But you might be wondering how to create a sitemap XML, especially if you have no prior coding experience.
Use the All In One SEO Plugin for creating sitemaps quickly and easily if you’re a WordPress user. It will create a sitemap for WordPress and a lot more for your website automatically.
What Is A Sitemap XML?
You might be someone who knows more about it than the others. Before I show you how to create a sitemap XML on your own, I will go over the sitemap basics.
A sitemap, also known as an XML sitemap, is a listing of all the pages on a site. The acronym XML stands for “extensible markup language,” which is a method of displaying data on a website.
Since sitemaps are regarded as a technical aspect of SEO, I’ve worked with a lot of website owners who are bogged down by the idea. In fact, creating sitemaps does not require becoming a tech expert or having a technical background. It’s not all that complicated, as you will see shortly.
What Is The Purpose Of A Sitemap XML?
Google and other search engines are dedicated to providing the most suitable results for a given search term. They use web crawlers to read, index, and organize results on the Internet in order to achieve this result.
Web crawlers can read the information on your website and index the pages more easily with XML sitemaps. As a result, you’ll have a better chance of improving your website’s search ranking.
Your sitemap in XML will let search engines know where a page on your site is located, when it was last updated, how often it is updated, and how important the page is in relation to other pages on your website. Google bots may assume that your website has duplicate content if you don’t have a sitemap, which will hurt your search ranking.
You can follow these five simple steps on how to create a sitemap XML if you want your website to be indexed quickly by search engines.
How To Create Sitemaps
Step #1: Examine the layout of your pages
The first step is to examine the current content on your site to find out how it is organized.
Here is a template sitemap to see how your pages will appear on the table.
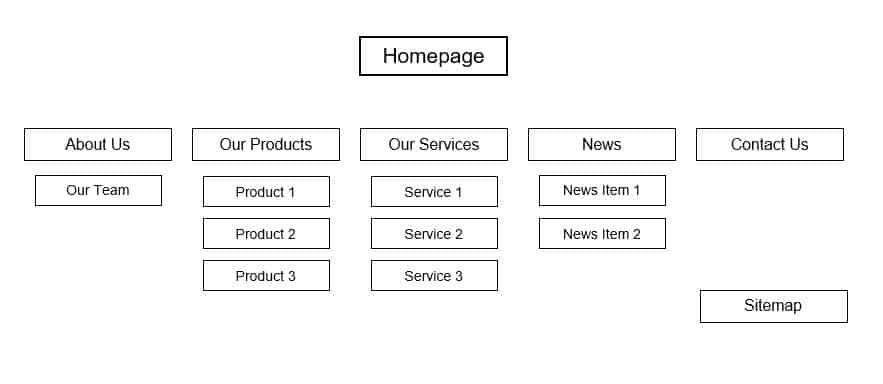
This is a simple visual sitemap example that you can follow.
It all begins with the home page. Then you must consider where your homepage is linking. Based on your website’s menu choices, you’ve probably already worked this out.
However, not all pages are made equal in the case of optimizing your website for the search engine. When you are working on this, have the depth of your site in mind. Understand that pages further from your website’s homepage would be more difficult to rank compared to the others.
You should strive for a lower-depth sitemap, which means it takes just 3 clicks to get to a particular page on your site. That’s a lot better for ranking in the search results.
As a result, you’ll need to organize your pages into a hierarchy based on their relevance and how you want them to be indexed. Create a logical hierarchy for your content by dividing it into levels.
Here’s an illustration of what I’m referring to:
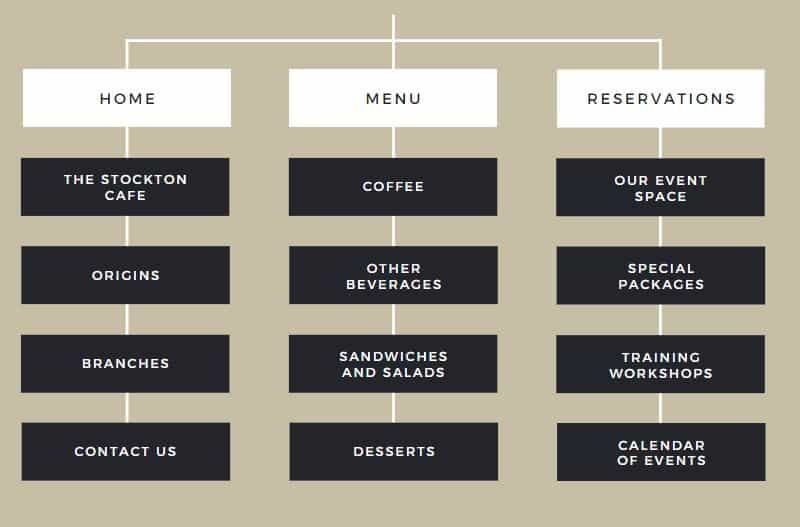
As you can see, the Menu page is linked to Coffee. Then there is a tie to the Other Beverages page.
The most critical page is the Menu, which is why it’s in the top-level navigation. Since it wouldn’t make sense to prioritize the Other Beverages page alongside Home and Reservations, it’s categorized as 3rd-level content.
The conceptual structure would be thrown out of whack if the Origin page is placed above The Stockton Cafe page.
So, to decide the hierarchy of your website pages, follow these visual sitemap models. Some of you may even have a system in place that is working well but could use a few tweaks.
Remember to set it in such a way that any page can be accessed in 3 clicks.
Step #2: Fixing the URLs
It’s time to code the URLs now that you’ve recognized the value of each page and mapped the importance in your site layout.
This can be accomplished by using XML tags to format each URL. This will be easy for you if you have some coding experience in HTML. As I previously mentioned, the “ML” in XML refers to “markup language”, which is the case for HTML as well.
Even if you’ve never done anything like this before, it’s not difficult to figure this out. Begin by using a text editor that allows you to construct an XML file.
Sublime Text is a good choice to think about.
Then, for each of the URLs, insert the appropriate code.
- the location
- last modified
- frequency of change
- the page’s priority
Here is an example of how each one’s code would appear.
- http://www.yoursite.com/page1
- 2026-01-01
- daily
- 3
Spend some time to ensure that you understand everything. When it comes to inserting this code, the text editor makes it easy, but it still needs you to be careful.
Step #3: Check the Sitemap XML code for errors
It is possible to make an error when the code is inserted manually. Any coding errors in your sitemap will prevent it from working properly.
Luckily, there are tools available to assist you in validating the code and making sure that the syntax is proper. There is software readily available on the internet to assist you with this. You will be able to find something by doing a search on Google for sitemap validation.
The XML Sitemap Validator tool is one of my favorites.
This will highlight any mistakes in the code.
If you fail to insert an end tag or anything similar, it can be easily found and corrected.
Step #4: Place your sitemap XML in the root directory and robots.txt
Find your site’s root folder and upload the sitemap in XML there.
By doing so, the page will be added to your website as well. This won’t be a concern since it can be found on a lot of websites. Simply enter a website’s URL and add “/sitemap” to the end to see what shows up.
Take a look at this sitemap in XML page from the Microsoft website.
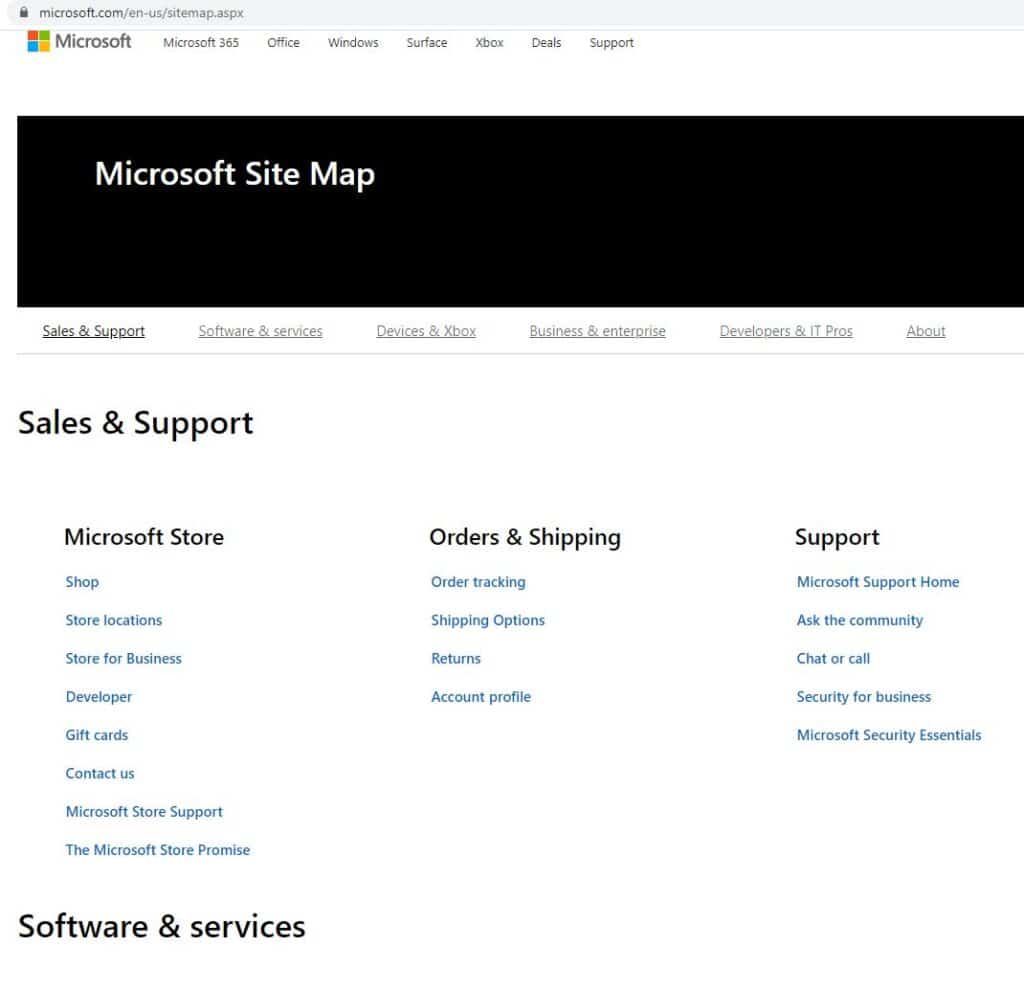
Note each section’s logical hierarchy and structure. This is what we spoke about in the previous step.
We can take things to the next level. By inserting “/sitemap” into the URL, you can observe the code on various websites.
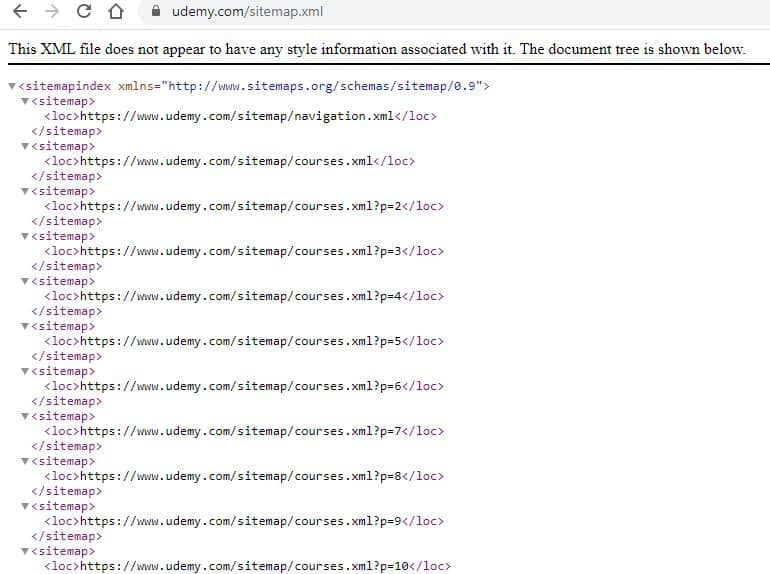
Sitemap XML For Udemy
On Udemy’s site, it looks like the following:
You would also need to add the sitemap XML file in the robots.txt file in addition to the root folder. This can also be found in the root folder.
This is essentially a set of guidelines for any crawlers that are indexing the website.
The robots.txt folder can be used for a variety of purposes. When search engines crawl your website, you can use this to show the URLs that you feel shouldn’t be indexed.
Let’s return to Udemy and take a look at their robots.txt file.
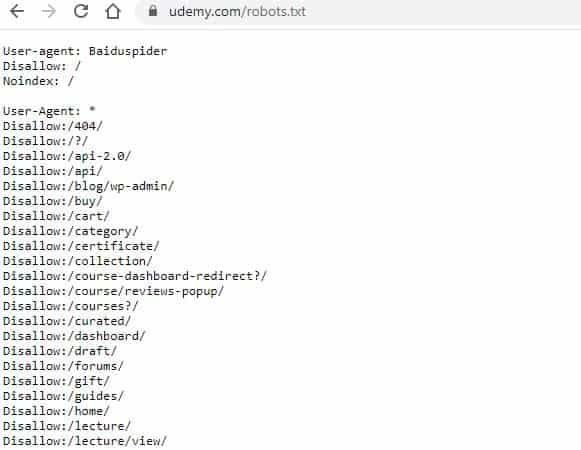
They have “disallow” on many pages on their website. As a result, crawlers ignore them.
Also, Udemy has included the sitemap XML file here.
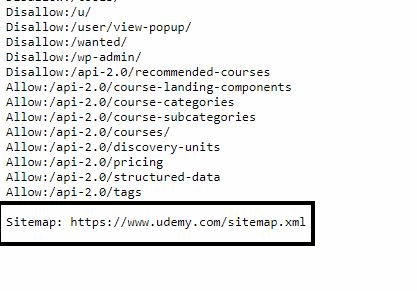
Not everyone adds their sitemaps in the robots.txt, so it’s up to you to decide if it is required or not.
With that said, I am a strong believer in adopting the best practices for businesses and websites. If a company as big as Udemy uses it, it can’t be a bad thing for you to follow as well.
Step #5: Sitemap submission
It’s time for sitemap submission to the search engines now that it’s been developed and added to your website files.
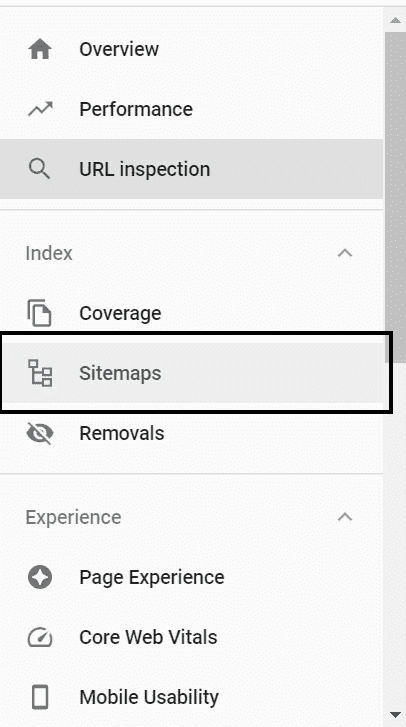
You’ll need to use Google Search Console to accomplish this. This might already be in place for some of you. If you haven’t already, you should get started right away.
Go to Index – > Sitemaps from the dashboard of the Search Console.
Then, at the top of the dashboard, you can add a new sitemap XML and click on submit.
This is an opportunity for you to double-check your sitemap in XML for any errors before proceeding. Obviously, you would need to correct any errors you find. Once you see that the sitemap in XML is error-free, click on submit and you’re done. Google will take care of the rest. Crawlers will now have an easier time indexing your site, which will increase your search ranking.
Other Alternatives
Even though these 5 steps are fairly quick and easy to follow, some of you will be hesitant to change the code on your website manually. This is completely understandable. Luckily, there are a variety of other solutions that can generate a sitemap in XML for you without requiring you to edit any code.
I’ll go over some of the best options for you to think about.
All-in-One SEO WordPress Plugin
If you are working on a WordPress site, you can create a sitemap XML by installing the All In One SEO Plugin.
With an easy toggle switch, the All In One SEO Plugin allows you to turn the sitemap in XML off and on.
Screaming Frog
Screaming Frog is a desktop application that includes a variety of tools for SEO. As long as the website has less than 500 pages, it is free to use for creating sitemaps. You’ll need to get the paid edition if you have a larger website.
Screaming Frog helps you to do all the coding improvements we had discussed earlier, without having to change the code on the file. Instead, you just have to follow some steps which are in plain English and more user-friendly. The sitemap in XML code would then be automatically modified. Here’s an example of what I’m talking about.
Simply update your settings in the tabs, and the sitemap in XML will be changed accordingly.
Slickplan
Slickplan’s visual sitemap creator is one of my favorite features. You’ll be able to use a template sitemap like the ones we discussed earlier.

To organize the hierarchy of your website, drag and drop various pages onto the template sitemap from here. If you’ve finished and are satisfied with the appearance of the visual sitemap, you can save it in an XML file format.
Slickplan is a paid tool, but there is a free trial available. If you are unsure about buying a plan, it’s worth giving it a try.
FAQs – Sitemap XML
1. Is sitemap XML required?
Having an XML sitemap is not obligatory, but it is highly advisable for improved search engine crawling and indexing.
2. How to improve SEO with sitemap XML?
An XML sitemap aids SEO efforts by assisting search engines in comprehending a website’s structure, leading to better indexing and visibility.
3. Do all websites have an XML sitemap?
Not all websites possess an XML sitemap, although it is advantageous for most websites, particularly larger or more intricate ones.
4. What is the benefit of sitemap XML?
Using an XML sitemap offers benefits such as enhanced search engine visibility, improved crawling and indexing of pages, and increased chances of appearing in search results.
5. What is the difference between HTML and XML sitemap?
HTML and XML sitemaps differ in format and purpose. HTML sitemaps are created for human users, visually presenting a website’s page structure. On the other hand, XML sitemaps are intended for search engines, serving as a structured file that aids search engine crawlers in efficiently navigating and indexing the website.
Final Thoughts – Sitemap XML
Create a sitemap XML for your website if you are keen to take your search engine ranking strategy to the next level.
It is not as intimidating as I have explained in this guide. As you can see, creating sitemaps is simple and only takes 5 steps.
1. Examine the layout of your pages.
2. Fixing the URLs.
3. Check the sitemap XML code for errors.
4. Place your sitemap XML in the root directory and robots.txt.
5. Sitemap submission.
There are other ways to accomplish this if you are intimidated by manually modifying code on your website. Several sitemap tools are available online, but the All In One SEO plugin, Screaming Frog application, and Slickplan are great options to consider.